Showing posts with label decorations. Show all posts

Thursday, 4 April 2013

Where dreams are made...

A couple of weeks ago we brought you a post featuring our lovely friend Emily's home (click here if you haven't seen it) but seen as Emma herself has a home full to the brim with beautiful trinkets, vintage items and patterns we thought today you could have a peek around her house too!


This is the wallpaper in her lounge - isn't it just stunning?


Flowers give it that beautiful spring look!


Her kitchen is just so cool.


Beautiful patterns everywhere!


The walls aren't forgotten about with plenty to catch your eye like the pictures above and below.


Saturday, 23 March 2013

A very vintage Victorian home

Today we'd love to share with you some of the beautiful things in our amazing friend Emily's Victorian house, which she shares with her hubby Mark and her gorgeous baby daughter Pearle. Her home is full to the brim with amazing vintage finds and it's all put together so fantastically. It really shows off their individual style!


This birdcage with pretty flowers is the centrepiece on her dining room table, while the side cabinet is laid out beautifully and includes a stunning picture of Em and Mark on their wedding day. This retro breadbin is found in the kitchen while they has this cool fireplace in their bedroom.


Above are the fireplace in the lounge, the chair featuring an amazing owl cushion in Pearle's room, boxes stacked up in their attic room and some fabric hearts which hang off the wardrobe in the nursery.


Everything here is amazing, especially the picture which hangs in the kitchen. Emily found the print in a book and had it blown up to fit - it just looks stunning!


In the kitchen there's something a little different to a regular fruit bowl! And how cute is this heart shaped jar lid?


All of the lamps in the house are so cute and match their room perfectly, these shelves with vintage teacups proudly take their place in the kitchen which this cute jewellery holder really catches your eye!


They painted this wardrobe themselves and it looks amazing in the attic room. The attention to detail really pays off in Em's house, with tiny things like these handles on the wardrobe adding the finishing touches to each room.


This bird picture is super cute, as is the Noah's Ark mobile in Pearle's room and the handles on the wardrobe in the attic room.


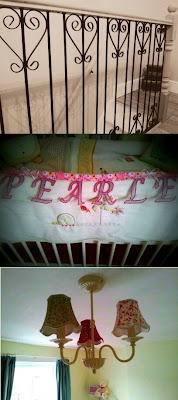
These are the railings in the attic room which totally add to the character of the room, while Pearle's room is just an overload of cuteness with her name spelled out on her cot and these pretty floral lights.


Love ornament in the attic room along with pretty wallpaper also owned by Emma! These cute flower lights brighten up Pearle's room and these shelves are just adorable.

We hope you've enjoyed having a look around Emily's house as much as we enjoy visiting!

H & E x

Friday, 8 March 2013

Friday finds: vintage and homeware treasures

Today we're mixing it up a little and instead of our regular Fashion Friday feature, we thought we would bring you some of our favourite treasures from our homes. As you'll see from the pictures, many of Emma's favourite things are antiques she's collected with the help of her dad over the years and some of the snaps are of pieces from her dad's home that they've found together. Whereas Harriet's are all a little more recent with some modern bits as well as vintage. Enjoy!

EMMA:


How amazing is this 1930s Beatrix Potter teaset? everytime i visit my daddys i always have a peek at my favourite things......i love this!!!


These suitcases make you want to pack up your belongings and travel around the world on an adventure!


The perfume bottle on the top right is from the 1930s too!this blue enamel ladies cigarette case is from the 30s love the elegance of it...

                                           these are some of my favourite vintage bags ive collected over the years from varoius antique fairs ive attend....this 50s wooden rocking horse is a beaut,which i brought for my beautiful grandson....

HARRIET:


The beautiful tape player on the top right was given to me by my nan and I absolute love the cushion on the bottom left which was made using vintage fabric by our lovely friend Emily.


I love the tin on the top left which stores all my earrings beautifully for me. I love owls and the cushion in the top right was a recent find from Primark.

H & E x

Thursday, 7 March 2013

Transforming Thursday: creating sparkly jars

Today we thought we'd show you how we made some really cute glittery jars - they're so easy to do and can really be done by anyone who's got ten minutes to spare. They can be used for so many things - make up brushes, for decoration with a flower or two in them, stationery, art supplies, eyeliners, spare pennies, anything you like really! Because they're so simple, if you've got children why not get them involved in making them? Be warned though, they're incredibly messy so make sure you've got something down to protect your carpet or table!


You will need:
- The jars (you can either use empty ones you have anyway or buy them from somewhere like Wilkinson)
- Glitter (ours was from Wilkinson and the glitter paint was from the 99p store)
- Paintbrush
- PVA glue


Step one: apply the glue to the surface of the jar

Step two: sprinkle your chosen glitter over it, ensuring you have something underneath to catch the excess

Step three: you can either stick with one colour or layer up the colours to create a patterned effect

Step four: Harriet used her glitter paint on the lid of one of her jars to create a sparkly effect and some Barry M glitter hearts on the other lid

Step five: wait to dry!


Don't they look cool?

H & E x

Thursday, 28 February 2013

Traditional Thursday: making your own bunting

Today we're going all traditional with a post about beautiful bunting! It's a decoration that's been around for years and years but the beauty of it is each one is different. Adding bunting to your wall is one of the simplest, cheapest and easiest ways you can brighten up a room without needing to pick up a paintbrush or start hanging wallpaper. If you're not the kind of person who wants an 'in your face' bright room, you can use bunting to add a little touch of colour. It really is so versatile and can be used in any room and doesn't need to be confined just to the walls - you can hang it from the top of your curtain rail, from shelves, above a mirror, off the mantelpiece or why not try making a miniature version to hang off a picture frame?


You will need:
- Decorative paper (ours is from Hobbycraft)
- Or sections of old fabric, offcuts of wallpaper, pieces of old books or any other material you like!
- Ribbon (ours was also from Hobbycraft)
- Mini pegs if you're going to peg them, otherwise you can sew or glue them on


Step one: Cut your fabric in to the shape you want, traditionally bunting is triangular but you can always choose a different shape!

Step two: Sew, glue or peg the pieces along the ribbon. You can use as many or as few as you like depending how long you want your bunting to be.

Step three: Why not try adding embellishments? Gems, sequins, different material cut in to cute shapes like hearts - the possibilities are endless!


How cute is this mini bunting?!
You could theme your bunting, for example if you were getting married why not add your names or Mr and Mrs across the bunting? Or make a 'happy birthday' themed string instead of a banner?


How cute are these examples of kitchens and dining areas decorated using bunting?


And these bedrooms are simply amazing! On the left they've made Winnie the Pooh themed bunting for a child's room - so cute!
(Last two images all from www.weheartit.com)

H & E x

Monday, 11 February 2013

Made it Monday: fabric letters

This is probably one of the simplest craft ideas ever and yet it leaves you with something beautiful you can display anywhere that's completely unique to you! These fabric covered letters are really ace and what makes them even better is you can choose the letter, the fabric and the decorations so no two will ever be the same (unless you want them to be of course!)


You will need:
- Cardboard letter (we got ours from Hobbycraft for £1 each)
- Glue
- Fabric of your choice (you can pick just one or loads, we got ours from our local haberdashery but you could use anything you like)
- Emma also used some patterned paper from a Hobbycraft book
- Sequins/embellishments (optional!)


Step one: Cut your fabric to fit and use the glue to stick in on to your letter.

Step two: Wait for it to dry (this is the hard part! It's difficult waiting when you want to get creative with the embellishments).

Step three: If you want to add anything to it, simply come up with the design and get sticking.

Step four: Display it proudly!


These are so fun to make and could even be a way to keep the kids occupied on a rainy day (although perhaps a big kid should take charge of cutting the fabric!) To make yours a bit different, why not try a different material? You could use off-cuts of wallpaper, patterned card/paper or why not cut up some old clothes you don't wear any more and use them? Or for children why not let them pick their favourite pages from a comic or magazine or add pictures of their favourite cartoon characters on to the letter?

H & E x

Thursday, 7 February 2013

Trash to Treasure Thursday: vintage bottle decorations


How fantastic do these old bottles look with simple yet beautiful flowers in them? They were all found by Emma's dad on his land and all that was needed was a quick clean to get them looking good enough to display anywhere.

Our ideas for using vintage bottles:
- As shown in the picture, why not put a flower in them and display them either individually or in a group on your windowsill, on a mantlepiece or even as the centrepiece at your dining table. Once the wild flowers start growing in the spring this is an even cheaper idea!
- Why not fill them up with shells/beads/pot pourri or anything else decorative and display them like that?
- If you thoroughly clean them, there's no reason why they can't be used to put drink in! How amazed will your friends be if you offer them a drink out of these when they come round?
- Let's be honest they're so lovely you can just use them as a decoration on their own.

It's simple ideas like this that can make your home truly unique and really reflect your style!

H & E x