Showing posts with label bedroom. Show all posts

Saturday, 23 March 2013

A very vintage Victorian home

Today we'd love to share with you some of the beautiful things in our amazing friend Emily's Victorian house, which she shares with her hubby Mark and her gorgeous baby daughter Pearle. Her home is full to the brim with amazing vintage finds and it's all put together so fantastically. It really shows off their individual style!


This birdcage with pretty flowers is the centrepiece on her dining room table, while the side cabinet is laid out beautifully and includes a stunning picture of Em and Mark on their wedding day. This retro breadbin is found in the kitchen while they has this cool fireplace in their bedroom.


Above are the fireplace in the lounge, the chair featuring an amazing owl cushion in Pearle's room, boxes stacked up in their attic room and some fabric hearts which hang off the wardrobe in the nursery.


Everything here is amazing, especially the picture which hangs in the kitchen. Emily found the print in a book and had it blown up to fit - it just looks stunning!


In the kitchen there's something a little different to a regular fruit bowl! And how cute is this heart shaped jar lid?


All of the lamps in the house are so cute and match their room perfectly, these shelves with vintage teacups proudly take their place in the kitchen which this cute jewellery holder really catches your eye!


They painted this wardrobe themselves and it looks amazing in the attic room. The attention to detail really pays off in Em's house, with tiny things like these handles on the wardrobe adding the finishing touches to each room.


This bird picture is super cute, as is the Noah's Ark mobile in Pearle's room and the handles on the wardrobe in the attic room.


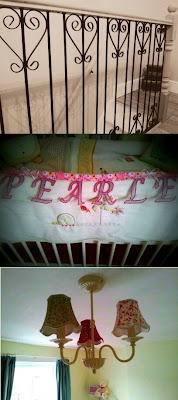
These are the railings in the attic room which totally add to the character of the room, while Pearle's room is just an overload of cuteness with her name spelled out on her cot and these pretty floral lights.


Love ornament in the attic room along with pretty wallpaper also owned by Emma! These cute flower lights brighten up Pearle's room and these shelves are just adorable.

We hope you've enjoyed having a look around Emily's house as much as we enjoy visiting!

H & E x

Wednesday, 6 March 2013

Worn out furniture Wednesday: overhauling your cabinet

Emma's been getting all creative and turning some plain old cabinets into some really special pieces! It's really cost effective to consider DIY rather than seeking out a sometimes pricey vintage or vintage inspired option. Plus it means you will get exactly the furniture you want without having to compromise on style, colour or finish - it's a win win all round plus it gives you an exciting project to plan which won't take up all your time but will give you a finished product which can stand in pride of place in your room of choice!


This was the original cabinet which was purchased for £5 at a second hand shop.


You will need:
- Small sample paint pots (these were £2.99 from Homebase)
- Clear varnish (this pot was £7.99)
- Sandpaper


Step one: clean the unit with soapy water then gently sand it down.

Step two: paint it twice, leaving to dry between each coat.

Step three: add a coat of clear varnish which will protect it from chipping.

Step four: sand down the edges and the feet to give it that shabby chic vintage feel!


H & E x

Thursday, 28 February 2013

Traditional Thursday: making your own bunting

Today we're going all traditional with a post about beautiful bunting! It's a decoration that's been around for years and years but the beauty of it is each one is different. Adding bunting to your wall is one of the simplest, cheapest and easiest ways you can brighten up a room without needing to pick up a paintbrush or start hanging wallpaper. If you're not the kind of person who wants an 'in your face' bright room, you can use bunting to add a little touch of colour. It really is so versatile and can be used in any room and doesn't need to be confined just to the walls - you can hang it from the top of your curtain rail, from shelves, above a mirror, off the mantelpiece or why not try making a miniature version to hang off a picture frame?


You will need:
- Decorative paper (ours is from Hobbycraft)
- Or sections of old fabric, offcuts of wallpaper, pieces of old books or any other material you like!
- Ribbon (ours was also from Hobbycraft)
- Mini pegs if you're going to peg them, otherwise you can sew or glue them on


Step one: Cut your fabric in to the shape you want, traditionally bunting is triangular but you can always choose a different shape!

Step two: Sew, glue or peg the pieces along the ribbon. You can use as many or as few as you like depending how long you want your bunting to be.

Step three: Why not try adding embellishments? Gems, sequins, different material cut in to cute shapes like hearts - the possibilities are endless!


How cute is this mini bunting?!
You could theme your bunting, for example if you were getting married why not add your names or Mr and Mrs across the bunting? Or make a 'happy birthday' themed string instead of a banner?


How cute are these examples of kitchens and dining areas decorated using bunting?


And these bedrooms are simply amazing! On the left they've made Winnie the Pooh themed bunting for a child's room - so cute!
(Last two images all from www.weheartit.com)

H & E x